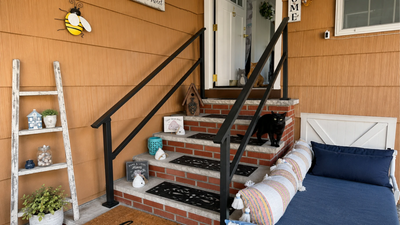
This commercial-grade stair handrail is easy to build with our all-in-one kit. Its 5-layer coating makes it weather-resistant in all seasons. Plus it’s modular, designed to be simple to modify and expand according to your needs.
The kit comes with all the required tools and clear instructions, making it a hassle-free DIY project.
×
Size chart
Size (Variant)
Total run (in)
Total run (ft)
1 & 2 Steps (CRHR1)
12”
1'
3 Steps (CRHR2)
12.01” - 24”
1.01’ - 2’
4 Steps (CRHR3)
24.01” - 36”
2.01’ - 3’
5 Steps (CRHR4)
36.01” - 48”
3.01’ - 4’
6 Steps (CRHR5)
48.01” - 60”
4.01’ - 5’
This chart outlines which variant of our Stair Handrail Kit you should purchase depending on the measurement of your stairs.
If your stairs are longer than 60 inches or 5 feet, you will need to combine two or more Handrail Kits to cover the entire run. Our Instant Quote feature can recommend you the exact products and parts you’ll need for your layout.
If you are connecting the Stair Handrail Kit to a Flat Rail Kit on a turn, purchase and use one size up for the top rail to reach the Flat Rail.
In addition to this, you also need to ensure that your stairs have enough clearance for our rails to fit.
For any type of staircase, you need to get the distance between the edge of the first step landing and the edge of the top landing. It is possible that you are able to measure the total distance in one go using your tape, however, you can measure each step individually for precision.
Below, we illustrate how you can do this for the most common types of stairs:
Without nosing
With nosing
Step 1: Measure the run or tread depth of each step beginning with the first step landing until the last step landing
Step 2: Add each measurement to get the sum or distance of your stairs
In this example, each step has a run of 11 inches and we have 4 steps. The total distance is 44 inches or 3.67 feet.
For stairs with nosing, the tread depth is equal to the run of each step plus the nosing depth.
We will need to get the tread depth of the first landing, and then get the sum of the runs for all succeeding step landings.
Our instructions assume uniform measurements for each step.
Step 1: Measure the nosing of the first step landing
Step 2: Get the tread depth of the first step landing (include the nosing in the measurement)
Step 3: Measure the tread depth of the second step landing
Step 4: Subtract the nosing from Step 1 from the measurement you got in Step 3. This is the run for this step landing.
Step 5: Repeat Steps 3 and 4 until you have the run for each succeeding step landing
Step 6: Add the tread depth of the first step landing (from Step 2) to the sum of the runs of the second step landing onwards (Step 4 and 5)
In this example, the first step is 12 inches deep and the succeeding steps are 11 inches deep. Together, the total distance is 45 inches or 3.75 feet.
Resolving clearance issues
Your top landing needs to have at least 8 inches of free space in order for the top rail to comfortably fit end-to-end without further adjustments.
If your top landing does not have enough clearance, the next section outlines some possible solutions for you.
Clearance workarounds
Option 1
Size down to a shorter variant (e.g., the 4 Step Kit).
Look
Function
Time & Effort
Pros
Easy. No modifications
Cons
Doesn’t cover entire length of stairs
Post baseplate potentially too close to step’s edge
Option 2
Move the whole rail kit down one step to bottom landing
Look
Function
Time & Effort
Pros
Easy. No modifications
Cons
Lower post extrudes
Doesn’t cover entire length of stairs
Option 3
Position top rail further down instead of centered
Look
Function
Time & Effort
Pros
Top rail covers entire length until door
No cutting needed
Cons
Top rail extrudes at bottom
Requires self-drill holes
Option 4
Move upper post down and cut top & middle rail.
Look
Function
Time & Effort
Pros
Perfect fit
Cons
2 cuts necessary
Requires self-drill holes
The Details That Sets us Apart.
Designed and warrantied by CR Fence & Rail, Henderson, NV.
 Ships in 1-2 days
 365 days return
 We manufacture
 Average customer rating