


10-year warranty

Modular, scalable design

International Building Code (IBC) compliant*

365-day return policy
Guard Rail Measurements

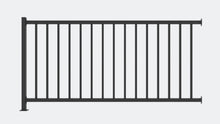
4.5’ Classic Guard Rail

6’ Classic Guard Rail
Order Right & Install Your Railing, Easily
Phase 1: What To Buy
Step 1 - End Posts & Section Kits
You’ll need to buy section kits to complete your railing system.
Your end post kit contains -
- 1 end post
- Metal Base Plate Cover
- Project tools & hardware
A section kit consists of -
- 1 line post
- 1 upper rail
- 1 lower rail
- Vertical balusters
- Masonry & drill bits, lag screws, wedge anchors, brackets
- Metal Base Plate Cover
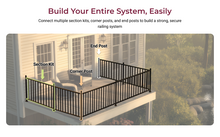
End posts are installed at the starting and end points of your railing system. Ideally, you’ll need two, or more in case you plan on installing it in sections.
You’ll need 2 end posts, per run.


Step 2 - Measure Your Space
Use a tape measure to estimate the total length of the area where you want to install the guard rail. For instance, your dimensions are 12’, 8’, and 10’. Your total length becomes 30’.

Step 3 - Estimate the Number of Sections Needed
With the length of each run, determine how many section kits are needed.
To do that, divide the total length of your space by 6’ (unless you plan to use 4’ rails), and round up.
For instance, on the side that measures 12’, it’s 12/6 = 2 x 6’ kits.
Similarly, on the side that measures 8’, it’s 8/6 = 1.3 = 2 x 6’ kits.
In this case, you can also go
with 2 x 4’ kits.

Step 4 - Buy Corner Posts (Optional)
To account for any turns along the length of your railing system, you’ll need corner posts that are designed to connect the rail from two sides at a 90° angle.
Simply count the corners across the span of your railing to find the number of corner posts you’ll need to purchase.

Phase 2: Trim Railing Sections
You can trim the guard rail sections in either one of the two ways

Option 1: Cut All Sections Equally (Best Look)
Measure the length of one run and then calculate the number of kits. If one side measures 10’, then:
10/6 = 1.6 = 2 x 6’ kits.
For your 6’ railing to fit evenly along the 10’ run, you’ll need to measure & cut off 1’ from the railing sections of both the kits.
| Appearance |

|
| Ease of Install | |
| Time Investment | |
| Extra Parts Needed | None. Adjustable brackets are included with all V1 sections. |

Option 2: Trim Only The Last Section (Easiest to Install)
Measure the length of one run and then calculate the number of kits. If one side measures 10’, then:
10/6 = 1.6 = 2 x 6’ kits.
With this method, you’ll need to trim the railing from one kit only — cut off 2’ from one section. You’ll be left with an uneven 6’ + 4’ railing along the side.
| Appearance |

|
| Ease of Install | |
| Time Investment | |
| Extra Parts Needed | None. Adjustable brackets are included with all V1 sections. |
Phase 3: Install All Posts

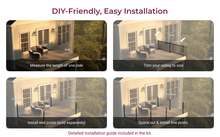
Step 1 - Mark & Install End Posts
Position the first end post where you want your guard rail to start, and the second end post where you want the guard rail to end.
Then position corner posts on spots where your railing turns round a corner.
Ensure the posts are level and mark the spots for drilling. Use the anchors & mounting screws from your kit to secure the end posts to the ground.

Step 2 - Evenly Space Out & Install All Posts
Measure the length of the rail section from your starting point and position subsequent line posts between the end & corner posts. Repeat, till you reach the end point.
Mark & drill holes into the ground. Then use the anchors & mounting screws to secure all your posts to the surface.
Phase 4: Install Railing Sections

Step 1 - Attach Lower Rail, Balusters, & Upper Rail
Fix the lower rail from your section kit to the end post and connect it to the line post on the other end.
Slide the balusters into the lower rail. The pre-fitted square tube seals in the bottom rail will hold the balusters snug in place.
Insert the upper rail over the balusters and secure it between the two posts.

Step 2 - Repeat The Process
To ensure your guard rail adequately covers your entire space, simply repeat step 1 and complete your installation.

Confused?
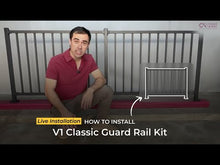
Watch the installation demo video below for step-by-step instructions for setting up your guard railing.
If you need help figuring out how many units to buy, we’re here to help! Let us plan your railing system.
See Other Guard Rail Styles
Safety, Made Easy For Our Happy Customers


FAQ
Yes, all our products are compliant with IBC housing codes in the United States. Read more about housing codes and compliances here.
No, the guard rail posts cannot be cut to size as they are designed for optimal strength and safety. However, the sections of the railing can be cut to fit your specific installation requirements, allowing for flexibility while maintaining the integrity of the posts.
The vertical clearance between the ground and the bottom rail is approximately 3-3/4 inches, providing enough space for proper installation while maintaining safety and aesthetics.
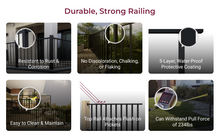
Absolutely! Our rails feature a tough, 5-layer black powder-coated finish that withstands extreme weather, preventing flaking, chipping, and fading. If you want to change the color, outdoor weather-resistant paint will adhere to the protective layer, allowing you to customize your railings while adding extra protection against the elements.
No, we do not accept leftover items as returns, since we cannot repackage them and they will end up in a landfill.
Yes, you can add a top rail to this design! For added safety and a more finished look, simply opt for our Guard Rail Kit with the top rail variant. This allows you to upgrade your existing setup without hassle and create a continuous, polished appearance.
All our rail kits are designed to be easy to install by a single individual. As long as you’re comfortable with using simple power tools, you should be able to handle the job without any special assistance.
Yes, the Guard Rail Kit can be attached to a wall. You can expand your railing system by connecting it to a wall or using an end post, making it flexible for different installation needs. The kit includes everything required for a secure attachment to either wood or concrete surfaces.
We want you to be completely satisfied with your purchase. If for any reason you’re not happy with the product, we offer a 365-day money-back guarantee. Simply reach out to our customer support team, and they will guide you through the return process to ensure a smooth experience.
Get a Quote in 30 Minutes(6am-6pm PST)
- Choosing a selection results in a full page refresh.
- Press the space key then arrow keys to make a selection.
 Ships in 1-2 days
 365 days return
 We manufacture
 Average customer rating








 Classic
Series
 Contemporary Series
